September 30, 2014

DIY Dreamcatcher

"Wisdom is born in the heart, and then spoken" ~ Wolf Clan Song

As a young child, I have been drawn to dream catchers, moccasins, and all things Native American.  Maybe it's the Native American blood running through my veins, or maybe its the meaning behind it all.  Dream catchers were created to capture the bad dreams in the web and the first morning sun would perish them away.  They were created to bless you with pleasant dreams while you sleep, good luck and harmony.  They are a sacred piece and should be treated with care.  It is not uncommon to bless your dream catcher after you have made or received one.  (I'll get to that after)  It is also said that dream catchers help us communicate with spirit while sleeping.  The first dream catchers were made of horsehair mesh, twigs, feathers, string or yarn and beads.  Not much like the modern ones we see today.  


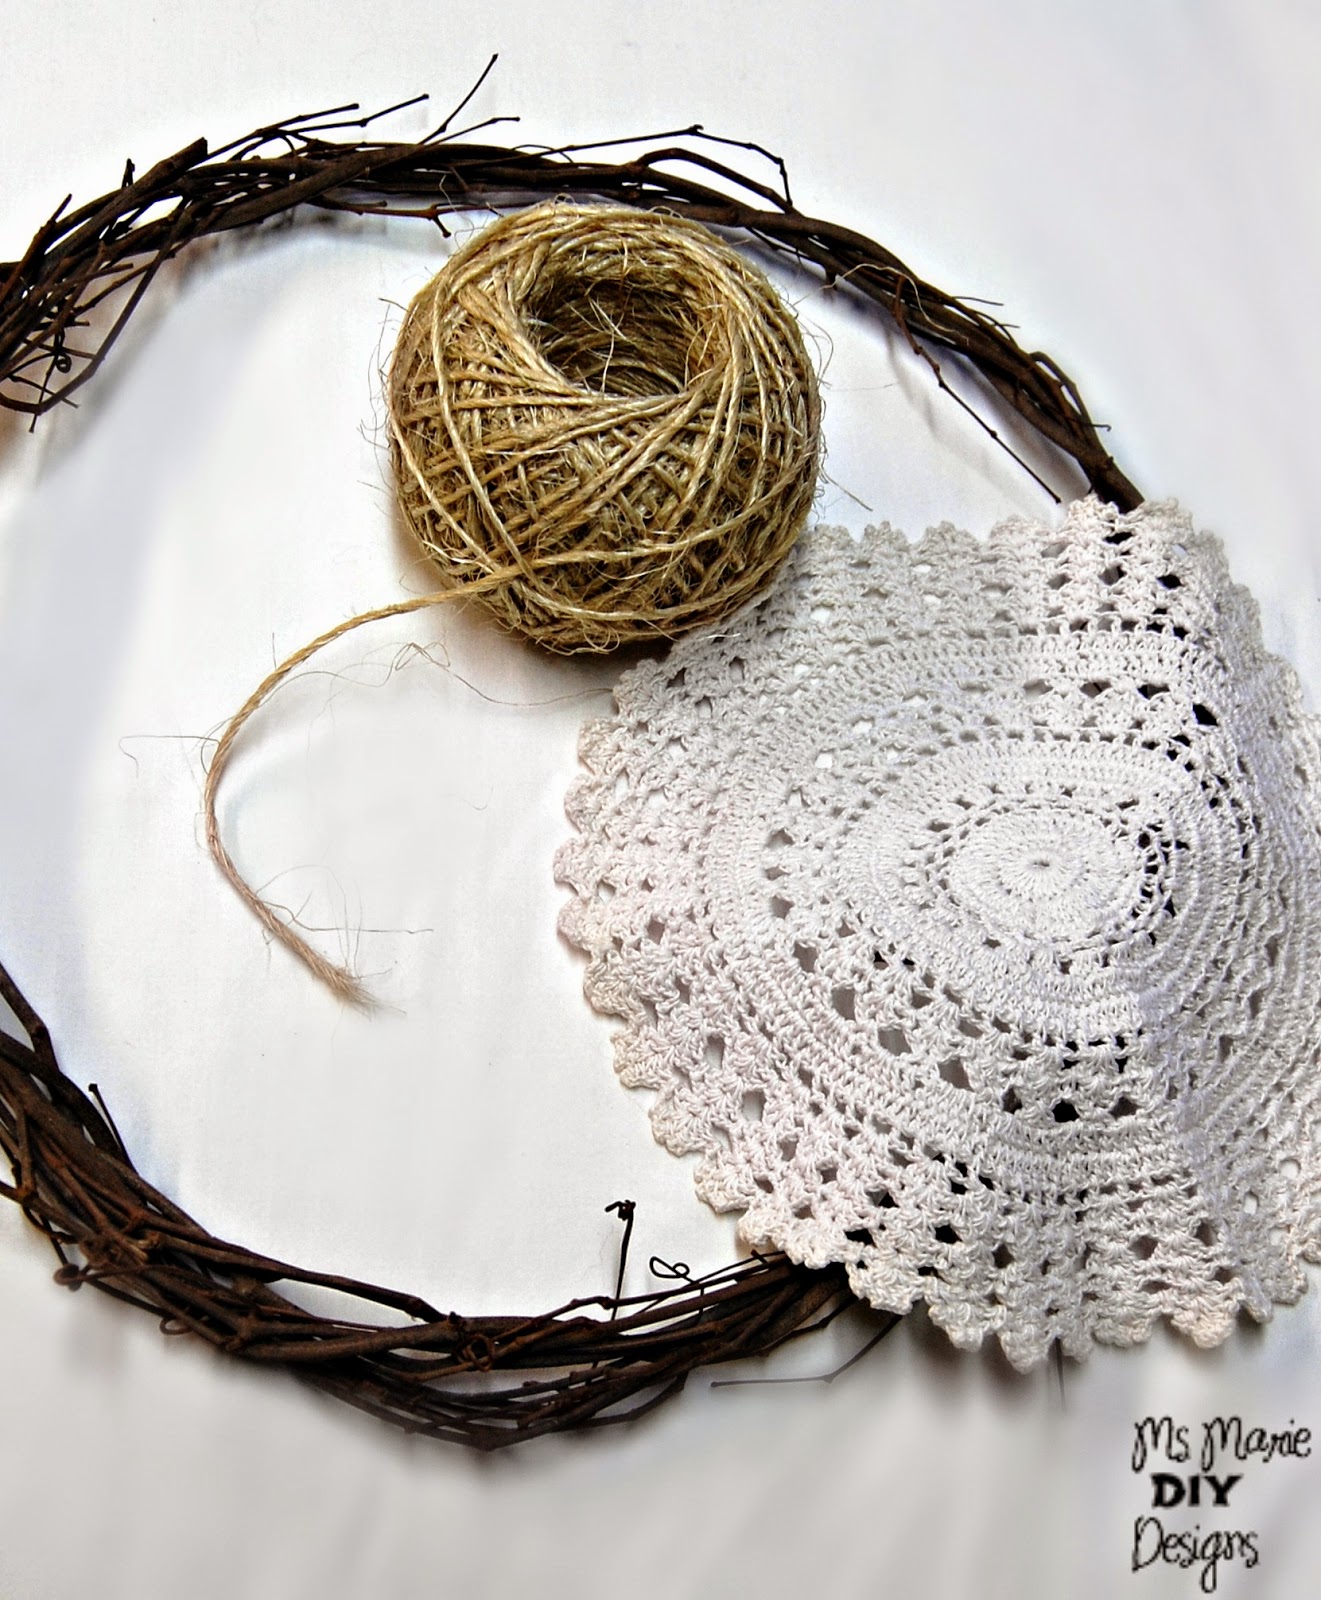
I have created my version of a modern day dream catcher.  I used a "twig" like ring that I bought at the local dollar store, twine (because it's closest to horse hair), a doily for a "web", wooden beads, glue (I used Elmer's because it dries clear), scissors and feathers.  Nice simple list of supplies.  Some of which you probably already have hanging around.  I'm going to start by going over how to make the first half.  You'll want to gather your supplies.  You can use a regular metal ring (and wrap it in leather cord), or even a wooden one.  Be creative.  Instead of twine, you could use leather cord, wax cord, string or yarn.  Don't have a doily?  Cut a piece of lace. (just make sure it is slightly smaller then your hoop)


Start by measuring your COC (cord of choice) 2 arm lengths and then cutting it.  Leave about 3 inches at the "top" of your ring and start to weave the COC through your web (aka doily of sort).  Now it may be best to count the amount of holes along the outside of your web. This way you can evenly space out where you will be weaving.  


Bring the COC up and behind the ring.  Then bring it back around and weave through the web.  I spaced my weaving every 5 holes, but the choice is yours.  The closer you weave, the tighter the web will be.  Repeat this step until you have gone all the way around the ring.  During this step, it is also important not to pull too tightly on the COC while weaving.  By keeping the COC loose and adjusting later, it will be easier to keep the web in the middle of the ring.  Once you have completed the step, start to adjust the tightness of the COC.  Start pulling it at one end and work your way around until you have reached the desired look.  Then, tie the remaining COC to the original piece you left at the "top" to create a loop for hanging.  


Now you have completed the first half of your dream catcher.  Once the ring and web are weaved, they represent love, honesty and purity.  The next part we will be creating the parts that hang from the bottom.  This is where I used the twine, wooden beads, glue, scissors and feathers.  Start by again, measuring out your COC 2 arm lengths and then cutting.  You will want to cut two more pieces the same length.  Gather all three pieces so they are all hanging in the same length.  Fold them in half and create a "loop" where they are folded together.  Bring the loop behind the ring (at the bottom of the ring) and pull the remaining pieces through it.  See picture below. 


You will now have 6 same size pieces of your COC hanging from the "bottom" (opposite side of where you will be hanging the dream catcher) of the ring.  Separate into two sections of 3 and braid each section.  As you are braiding, add the beads.  It is best not to have all the sections be the same size.  It is also best to space out the beads differently.  The beads are where you will be adding the feathers later.  See picture below for example of braiding and bead placement.  


Once both sections are braided and beaded, Repeat step above to add another 2 sections.  Keep repeating these steps until you have the desired amount of sections hanging.  I created 10 sections total, about 12"-14" in length.  Make sure they are all evenly spaced apart at the "bottom" of the ring. You don't want a lop sided looking dream catcher!


Now it is time to add the feathers.  I started by deciding how far I wanted the feathers hanging and then cut them to size.  The feathers are going to be tucked into the beads.  You can use as many or as little as you want.  Once you have cut them to size, place glue at the part that will be going into the bead (pointy side) and place then where they need to go.  Repeat until all the beads have feathers.  Then let dry about 12-24 hours.  And voila!  You have created a dream catcher.  Pretty simple huh?!


One last step, and the most important.  Blessing the dream catcher.  The Native Americans used to use cleansing Sage.  So, if you happen to have some, great!  If not, (you should get some, it's great for getting rid of yucky energy) you can use your imagination.  Use the Sage to clear and ask that your dream catcher bring you good dreams and happy thoughts.  Ask that all bad dreams be captured by it's web and perish with the morning sun.  If you want, you can even ask that your dream catcher help you communicate with the spirits during sleep.  Place and treat your dream catcher with care.  Remember, it is a sacred object.  

Happy Dreaming!!!    ~Amanda


September 27, 2014

One with Mother Nature

"My child, be still.  Breathe.  Look at all the beauty that surrounds you.  Relax, and enjoy my beauty." ~Mother Earth

Mother Earth, Mother Nature.  What do you picture when you hear these words?  Do you picture a beautiful landscape?, the birds?, a globe with hands, legs and a wig?  (Maybe a little exaggeration on the last one)


I started taking Intuitive Development classes and my last class, we were sent home with "homework".  Our mission, Earthing.  Now, I know your scratching your heads, what is Earthing?Simple.  Being one with Mother Earth.  We had to place our bare feet on the ground, and describe what we felt, saw, heard and smelt.  


I chose to do my "Earthing" exercise on the night of the full moon.  The energy is higher during a full moon and it leaves it's effects 3 days before and 3 days after.  Ever notice the energy shift during those times?  If not, start to pay attention.  During a full or new moon, is a good time to release what no longer serves you.  So I thought, what better way to connect with Mother Earth then during the full moon.  Nine O'clock comes around and there I stand, in the back yard, hands on hips, eyes closed, waiting for my messages.  With in minutes, she starting talking.  I received the message above.  "My child.....relax, and enjoy my beauty" (see full message at top of page) The words just come to me like they were being read out of a book.  I could feel the cool breeze blow through my hair and as I breathed it in, a flood of calm came over me.   Then the words stop.  A symphony of crickets soon follow and as I listen to the music, I can feel my feet getting heavy.  Almost as if they were rooted to the ground.  A slight tingling feeling made me lift my feet for comfort.  I open my eyes and look around.  I am surrounded by darkness except for the neighbors lights shinning from all four corners of the yard.  I smiled and felt peaceful as I made my way back into the house.  I am thankful for the experience.  

I try to have moments like this everyday.  Maybe it's the photographer in me.  I can't help but see the beauty Mother Earth provides us every where we go.  From the array of colors on the trees, to the bugs that parade the ground.  (and everything in between)  I just love taking the back roads just for the scenery.  


Live life simply.  Take time to breathe.  If I feel like life is moving to fast.  I take lesson from my pup.  Ever notice how they seem to just enjoy life?  Here she lays, nose to the wind, enjoying the warm breeze.  She surely knows how to sit back and relax.  


Chesney just loves having her picture taken.  I swear she knows, look at those poses!  Anyways, see how relaxed she is.  One with nature!  She could spend hours outside, just laying in the grass, soaking up all that nature has to offer.  

So now I leave you all with homework.  I want you to do some "Earthing".  It doesn't matter what time of day, or where.  You could be driving, working, sitting at home.  If you see something that catches your eye, stop, get out, and enjoy it!  Happy Earthing!!


September 25, 2014

How to take great iPhone photos Part 2

"Keep calm, and snap on!"  Love it!

Well hello again!  Did you play around with your camera's after your first lesson? Take any good pictures?   I also wanted to mention a couple of tips when taking pictures.  This won't directly relate to iPhones.  In fact, you can utilize these tips when using any type of camera.  When taking a picture of a subject, try different angles.  Maybe turn the camera sideways, or even just slightly angled.  You don't always have to have your subject in the center of the frame.  See the pictures below, same subject, different angles, different effect.  Make sense?  Good.  If you want to learn more, you can find free courses online.  Craftsy is one webite you can got to that offers photography courses, though not all are free, they are decently priced.  Here's an example of one of their photography courses.  They also offer cooking tips, sewing patterns, jewelry making, the list goes on.  It's free to sign up so check it out!

Now, lets talk apps. All kinds of apps, the good ones, the bad ones and the in-betweeners (that relate to photography of course).  I have only a very select few apps on my phone for editing and such.  I'm not a huge fan of editing, I prefer to spend time doing other things (like writing to you guys!).  Or, if I do edit them, I prefer the quick and easy way. (of editing that is, dirty people)

I'm going to talk about my favorite app first, The Pro HDR app. This app did cost money, it is not a free one.  But I promise, you'll love it.  The way this app works, is it analyzes the whole picture before snapping the picture.  It takes 2 pictures and combines them together.  The end result, an amazing photo.  Here's an example of two photos taken with the app.


See how vibrant the colors are?  You can even see the reflection in the water

I use the Pro HDR app a lot when taking pictures outdoors.  It helps to highlight every aspect of the picture.  The key when using this app, it to make sure you have a steady hand.  Otherwise, you'll end up with double images.  If you don't feel too steady, find a place to rest your phone when snapping the picture. They even make little tripods for iPhones as well.  You can use the Pro HDR app to edit pictures in your photo album.  Though, you don't get quite the same affect, it does help to saturate the colors in your photos.  I used the app to edit these pictures after I had already taken the picture.


Aww my baby!  She's such a great model.  Here is an example of when I snapped the picture and used the Pro HDR app after to "edit" it

Because the app takes  a few minutes to analyze and take the picture, Chesney just doesn't have the patience to wait.  So, for the sake of having an image of a two headed dog (or in similar situations) it may be best to snap first and edit later.  

The next app I use is the Picstitch app.  I think this app was free.  You can do some slight editing in this app but mostly it is used to create a collage. You can chose from different formats and lay outs.  See an example below. 

Like this picture.  I may be a little bias but, I'm pretty sure that Bostons are the best!
You can then chose to upload the photo directly to your photo album, Instagram, Flickr or  Facebook. Show off your talent for the world to see!!  There are other apps for photography, tons actually.  But I only use these two.  Like I said, I'm not much for editing.  If you have any others that you like, let me know!

In the meantime, There are so much beauty out there right now to be capturing, so snap away!


September 23, 2014

Pumpkins, and Mums and Chesney, Oh my!


"Life starts all over again, when it gets crisp in the Fall" ~ F. Scott Fitzgerald


I thought I would share a quick post.  Being that it's now officially Fall, (the best season of the year!)  I couldn't help but take my phone, and my dog and find some fun photo opportunities!  I went to a local Garden Center and bought myself a big hanging mum and a pumpkin.  I wanted to grab some corn stalks but they wouldn't fit in (or on) my car.  Bummer.  


All of these pictures were taken with my iPhone using the "chrome" filter.  Today was a nice sunny day, no over cast.  As you can see, the pictures came out with a nice saturation of color and isn't flooded with light from the sun.  


I have such an affinity for flowers.  Dahlias are one of my favorites.  The blooms are so large and colorful.  


Ok, now maybe this is little too much but, I saw the perfect photo op and I took it!  Look at how pretty she is next all those colors.  It's like it was all put together just for her!


 I spy, with my naked eye.....pumpkins!  All sorts of pumpkins.  Big one, small ones, orange ones, green ones.  Some had "bumps", some were smooth.  I never knew there were so many kinds!


 I could have filled my car with all the colors of Fall.  But I resisted and walked away with these pictures instead (and a mum and pumpkin)

Take the time to step outside today, even it's just for a few minutes.  Stand tall with your feet on the ground and your nose to the sun.  Breathe in and out.  You'll instantly feel calmer.  Trust me, it's amazing what Mother Earth can do!


Happy Fall everyone!!!!


September 22, 2014

How to take great iPhone photos Part 1

"Photography is the beauty life captured" ~Tara Chisholm

Howdy y'all!  (said in my best southern accent)  Today I'm going to give you some tips and tricks on how to take great photos with your iPhone.  Now, I want to point out a couple of things, 1. I'm not claiming to be a professional, these are tips fro my experiences and 2. I have nothing against any other phone, I just happen to own an iPhone (one of the best phones out there, but no judgement). So, now that thats out of the way, let's get our hands dirty.  Below are some pictures that I have taken recently with my iPhone 5c.  Now, you may not get the same quality of photo if you are taking a picture with your iPhone 4, but the features should be the same if you have the most recent update.  


Most of you probably already know how to use your iPhone cameras basic features.  So I'm going to be highlighting a few things you may not have already known.  Like when to use the different filters or that you can change the aperture.  


Lets talk filters for a minute.  These pictures are taken along the back roads of Hollis.  Man, there is so much beauty there.  I just can't get enough.  I purposefully take the back roads so I can enjoy the country scenery.  I used the "chrome" filter option when taking these pictures below and the one above.  Now, I want to add that no editing has been done to these pictures.  These are straight from my phone to you.  


Now, I personally like using the "chrome" filter when taking pictures outdoors.  I think it helps to saturate the colors and even tones down the brightness of the sun.  But, if you use the "chrome" filter indoors, it can almost give you a yellow hue.  Not so nice when your taking pictures of people and they come out looking like an Umpa Lumpa!  This is where I use the "normal" filter (and a little photo editing secret, which I'll reveal later) When taking pictures, I tend to rotate between "normal" and "chrome" filter.  And if your looking for something a little more dramatic, you can use any of the black and white filters.  Such as below


Ugh! That face!! How can you not love that face!! That's my love Chesney.  See, told you she would be making an appearance, or two (or three, or four)

Anyways, back to photos.  Another option to play around with, while taking your photos, is the lighting (aka aperture).  When you tap anywhere on the screen, while in picture mode, a tiny square appears.  This little square not only focuses where you point but also draws light from that area.  Say for instance you are taking a picture and the sun is in the upper right corner.  Well, if you tap on the screen (upper right corner) where the sun is, it is going to fill your photo with light.  The further you tap from the sun, the darker the image.  Make sense?  You can also lock in aperture by tapping on the screen where you want the light source to come from, and hold your finger there until the square blinks and a tiny "sun" shows up.  This little tip can make a huge difference when taking a picture.  You may notice you do less editing later.  


So my iPhone photographing friends, go, play with your filters (now, keep your mind out of the gutter people) Get your hands dirty (well not too dirty, you don't want to ruin your phone) and take some amazing pictures!  
Stay tuned for Part 2 where I'll be talking apps ;)

September 21, 2014

Falling over Fall


"I'm so glad I live in a world where there's October's" ~L.M. Mongomery


Fall is my FAVORITE time of year. Yes, that is all caps because I mean it!  It is a short lived season but filled with oh so many goodies!! Ummm, let's see, there's fairs, apple picking, pumpkins, warms foods, and "cuddling up with a blanket and book" kind of nights. The list just goes on!! There's something in the air that just inspires you to get up and move. Do you feel it? It's like a charge, a bolt of electricity that just makes you want to save people, stop world hunger, start world peace! Ok, maybe that's a little dramatic (just a little) but, you get the idea :). 
Strolling around my neighborhood the other day, I couldn't help but stop and take pictures of the leaves. 


There was something about them that made me smile. It was a perfect (almost fall) morning. Just the right amount of chill and sun. The air smelled so crisp and breathing it in charges me for the day. Like a meditation (but I'll get into that another day). It was the perfect setting for a yard sale. Which is just what we did. By "we" I mean my Grams, Chesney (my furry companion) and I. Here she is below soaking up that sunshine. Chesney that is, not my Grams. Haha


Isn't she just the cutest! Ugh, I can't stand her cuteness sometimes. Anyways, back to the yard sale. We did pretty well but weren't able to sell it all. I told Grams, it wasn't going back in the house (in my most stern voice, which really isn't all that threatening) We donated the "remains" to a fairly local company that will put the items up for sale at their second hand store. I think it was the changing of the seasons (or my constant persistence) that inspired us to clean house. I went through my things but Grams, man, she went full force. She went through every room of the house, including the attic and the dreaded nooks and crannies of the basement.  It's amazing what you can find when your looking.  She had her mind set, and she dove head first.  I really was proud of her.  

It's time for me to start the day.  So I leave you with one more quote "Autumn is a second spring, when every leaf is a flower" ~Albert Camus.  Pretty huh?!  Happy (almost Fall) everyone!